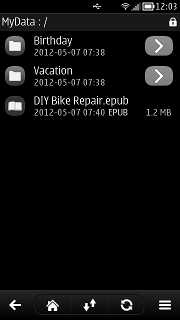
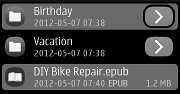
WebDAV client for Nokia Belle


When you start davi for the first time after downloading davi from the Nokia Store and subsequent installation, the app welcomes you with the initial setup. Here, you can
You need some inspiration for the WebDAV account configuration of your favorite online storage Web service or for your NAS, then consider the following configuration examples.Further WebDAV shares can be added later, when the initial setup is finished.
Maybe, you have to correct some details on your WebDAV share. Then, you can also edit you share later on.
Example:


After starting davi and entering correctly your app password, davi will show you the list of WebDAV shares.
If you have forgotten your password, davi lets you also reset your app password.


Once you selected a WebDAV share, davi will establish a connection to the Web server. If this is successful, you will see a list of files and directories available on your WebDAV server.
You can also add a new WebDAV share using the plus button . Additionally, several other actions are available via the menu button . The menu offers you the following actions:
Press-and-hold gesture on a list item opens a context menu for editing or deleting a WebDAV share. Swipe gesture from right to left on a list item shows edit and delete buttons.


After selecting and connecting to a WebDAV share, davi obtains the directory listing.
If the certificate for HTTPS encryption (SSL/TLS) from the WebDAV server is not signed by an accepted certification authority (CA), davi will show you the details of the certificate and you have to confirm the certificate before davi can connect successfully to this server. NAS WebDAV servers use often self-signed certificates without any usage of a CA, so that you have to confirm their certificates. Once you confirmed the certificate, davi will store the MD5 and SHA1 digests for this certificate in your configuration for this WebDAV share. These digests can be reseted while editing the configuration for a WebDAV share.
The listing is sorted alphabetically and directories appear at the top. Then, you can start to navigate. Use the right arrow button to open a particular directory or use the left arrow button at the bottom left to navigate back to the parent directory. If the current directory is already the root directory of your WebDAV share and you press the back button, then davi will ask you if you want to close the connection. When your answer is yes, davi returns to the list of WebDAV shares. In case of active downloads/uploads, the confirmation dialog will warn you about the abortion of all these ongoing transmissions.
The name of the current share and the current directory path are shown at the top. Additionally, it is shown whether the connection is encrypted (a closed key for HTTPS) or unencrypted (an open key for HTTP).
The toolbar at the bottom shows from left to right the back, home, transfer queues, refresh, and menu buttons.
Press-and-hold an item to open the context menu. Then you can mark or unmark all items of the directory listing. Additionally, you can copy the URL to the clipboard, send a SMS or an Email with the URL of the current item.
Click on an item to mark or unmark this item. If you have marked one item or several items, then you can open the main menu via the menu button and download, delete, copy, or move this/these marked item/items. Rename is only available in the main menu if one item is marked.


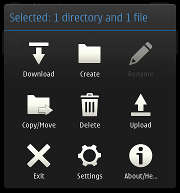
Clicking on the menu button on the toolbar of the WebDAV directory listing shows you the main menu. Download, delete, and copy/move operations can be started for marked items. Create lets you create a new sub-directory. Rename lets you change the file/directory name, if you have marked only one item. Upload opens a file browser, where you can select files/directories, which will be added to the upload queue. Exit will quit davi after your confirmation. Settings lets you change your WebDAV share settings for the current share. You have to close the connection in order to edit the settings. About/Help shows information about the app, contact details for support, and provides a button to open this online help.
Mark files/directories in the directory listing and use the download button in the main menu. Then, marked files are added directly to the download queue, while marked directories are recursively parsed and all files are added then as well to the download queue. After successful adding, davi shows you automatically the download queue.
If many files have to be added to the download queue a progress dialog is shown. Here, you can also abort the adding and all previous added files are removed from the download queue. If the total file size of all added files exceeds the free space on the local drive of your phone, then davi will automatically abort the adding and inform you about the lack of free space.
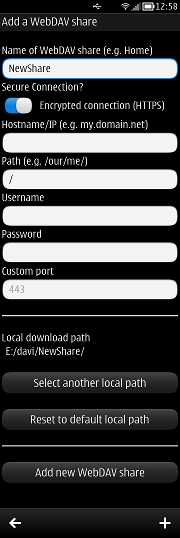
If you need more free space, you can go back to the list of WebDAV shares and edit the particular share to select a different local download directory on a drive with more free space.
Files that are already included in the download queue will be ignored if you try to add them again.
You will have to confirm the overwriting of a file that are already available on the local drive of your phone. Confirming or declining the overwriting can be done per file or for all files.
Open the main menu, select Create and enter the name of the new directory. The create button starts the creation itself on the WebDAV server. After successful creation, you will see the directory listing of the new directory.
Mark a file or directory and open the main menu using the menu button. Click on Rename. Then, rename page opens. Here, you can edit the current name within the text field or enter a completely new name for this file or directory. Click on "Rename" to perform the actual renaming. davi will then go back to the directory listing.
Mark one or several files or directories. Open the main menu and select Copy/Move. The copy/move dialog opens and you can select whether you want to copy or move the files/directories or cancel the copy/move operation. davi shows you then a directory browser for your WebDAV share. Here, you can navigate within the directory hierarchy with the right arrow button or the left back toolbar button until you found the desired destination directory. Press on the particular directory and the copy/move operation will be started.
Mark one or several files or directories. Open the main menu and select Delete. Subsequently, you have to confirm that you really want to delete these files/directories. Otherwise you can also cancel the deletion.
WARNING: davi will delete directories recursively. Once you confirmed the deletion of a directory, the WebDAV server starts the deletion of the whole directory hierarchy.
Once your are in the desired upload destination directory on your WebDAV share, you can start an upload via the main menu. Use the upload button to open the file browser. The file browser shows you the local files/directories of your smartphone. The first view is a list of available local drives. You can navigate through the directory hierarchy of your phone until you find the desired files/directories. Mark these files/directories for upload and start the adding to the upload queue by pressing the upload button on the bottom right.
Then, marked files are added directly to the upload queue, while marked directories are recursively parsed and all files are added then as well to the upload queue. After successful adding, davi shows you automatically the upload queue.
Until you marked some files/directories, the exit button is shown at the bottom right, which can be used to close the file browser and go back to the current directory listing of your WebDAV share.
If many files have to be added to the upload queue a progress dialog is shown. Here, you can also abort the adding and all previous added files are removed from the upload queue.
Files that are already included in the upload queue will be ignored if you try to add them again.
You will have to confirm the overwriting of a file that are already available on the WebDAV destination directory. Confirming or declining the overwriting can be done per file or for all files.


After adding files to the download or upload queue from the WebDAV directory listing, davi automatically shows you either the download or the upload queue.
Use the two tabs for Download and Upload to switch between the two transfer queues.
The toolbar at the bottom offers a back button and a pause/resume or a stop/restart button.
The back button lets your navigate back to the WebDAV directory listing. While a file transfer is active, you can add more files to the download or upload queues. Be aware that the responsiveness of davi for this depends on your phone's clock speed, the number of file transfers in parallel, and the available transfer speed.
The pause/resume buttons are shown only for the download queue, if the WebDAV server supports the pause/resume of downloads. Otherwise, you can stop/restart your downloads. The stop/restart button is always available for uploads. The pause/resume or stop/restart affects all active file transfers for each queue. So you can pause/stop independently the download and upload queues.
To edit the list of queued file transfers, you use the press-and-hold gesture for the item that should be removed and select Cancel current download/upload. Using this context menu, you can as well Cancel all downloads/uploads, Mark all items, or Unmark all items. By pressing on an item in the transfer queue you mark or unmark this particular item. When one or several items are marked, the context menu opened by press-and-hold offers also Cancel current marked download/upload or Cancel all marked downloads/uploads, respectively. Unfinished files for download will be deleted from the phone during the cancelation. While editing the transfer queue, it can be very useful to pause/stop the active transfers until the editing is finished.
Alternative to remove queued files transfers: Use the swipe left gesture on an item. davi shows you then a delete button for each item, so that you can remove individual files transfers from the queue.


The toolbar at the bottom of the WebDAV directory listing (main view) shows from left to right the back, home, transfer queues, refresh, and menu buttons.
Back button
Home button
Transfer queues button
Refresh button
Menu button


davi is configured initially after the first start.
Later on, you can change settings or manage your WebDAV shares directly after successful authentification with your app password.
The menu button on the "davi - WebDAV shares" page provides access to:
To edit or delete a WebDAV share you have to press-and-hold the respective item in the list of shares. Then you will see a context menu, where you can Several configuration examples for adding a WebDAV share to davi for remote access to your NAS or for an online storage Web service can make your quest for the correct configuration details a little bit easier. 
 
 
davi protects your account details of all WebDAV shares with the AES-256 encryption algorithm. Your app password can have at minimum 4 and at maximum 32 characters.
You define your app password at first during the initial setup of davi.
davi requires your app password each time you start the app in order to get access to your list of WebDAV shares. Without your password, davi cannot decrypt the account details of your WebDAV shares. If you have forgotten your app password, you can use the reset function.
After entering the password you have to wait until the password input field shows only asterisks before clicking the "Start" button.
Davi lets you reset the app password with the "Reset" button on the "Welcome to davi" page. Then, you start over again with the initial setup of davi. Here, you can define a new app password as if you start davi the first time. This feature can be useful in the case that you have forgotten your app password. Be aware, that the configuration details for all WebDAV shares are deleted and you have to add again all shares.
If you want to change your app password you have at first to start davi. Enter your current app password and click "Start" to get to the list of WebDAV shares. Open the menu (right button on the bottom) and select "Change app password". Then, you can enter your new app password twice to ensure the correctness of your new app password. The change of your app password is finished with a re-encryption of your data of WebDAV shares. Then, davi will show you again the list of WebDAV shares. You have to use the new app password the next time you start davi.


The following properties have to be configured while adding a new or editing an existing WebDAV share.
WebDAV extends HTTP/HTTPS so that you can access a WebDAV share as if you use a file manager. Additionally, files and directories can be download to or upload from your smartphone.
Often an URL (Uniform Resource Locator) is provided for the WebDAV access to a server. Together with your username and password, the URL includes all necessary details for a WebDAV client to open a connection to the server.
However, davi lets you configure separately each property of a WebDAV share. The following two exemplary URLs show for the sake of clarity how the parts of an URL correspond to the individual properties.
You need just some more inspiration for the WebDAV account configuration? Then, you should consider the configuration examples for NAS and popular online storage Web services.
Name of WebDAV share
Secure Connection?
Toggle between HTTPS and HTTP.
While HTTP (Hypertext Transfer Protocol) transmits data without encryption, HTTPS (HTTP Secure) encrypts data before transmissions.
You should always use HTTPS. Especially, if you use davi together with public WiFi, 3G, or GSM networks. For that reason, HTTPS is used per default.
Use HTTP only in secure network environments, e.g. access local WebDAV server on your secured local home WiFi.
Hostname/IP
The hostname is the network name of an Internet server. It can be a pure domain name, e.g. "files.com", or can consists of the local name of the host followed by its domain name, e.g. "server.files.com".
Alternatively, you can specify a server with its IP address (currently only IPv4), e.g. "192.168.1.2".
Path
If only a hostname for a WebDAV server is given, the path is always "/".
Otherwise you have to enter the path here, e.g. "/MyData/" or "/MyData/MyDocuments/".
A path has always to start and end with a slash.
Username
The username is the name of your account on the WebDAV server.
Password
The WebDAV server needs for your authentication also a password.
Custom port
If no number is given after a colon in an URL for a WebDAV share, then you can leave this field untouched as davi will use the standard ports for HTTP or HTTPS.
But, sometimes a server offers its WebDAV service on a custom port, which can then be entered here.
Local download path
By default, davi locally stores downloaded files on your smartphone on the drive, where davi has been installed. Thus, if davi is installed on the internal mass storage drive E:, the local download path is "E:/davi/sharename/", where sharename is replaced with the actual name of the WebDAV share.
You can also select another local drive/path on you smartphone. Clicking the corresponding button lets you navigate to the parent directory of your path. Then, always the name of the WebDAV share is appended to this selected path.
To use again the davi default local download path, you use the "Reset to default local path" button.


The general settings change the behavior of davi as a whole and thus applied to all WebDAV shares.
Number of download in parallel
Adjust the number of possible active downloads here. Increase the number if you have to download many small files, but use only 1 active download at a time for optimal performance for larger files.
Number of uploads in parallel
The default number of possible active uploads is per default 2, but can be changed if necessary. The optimal number depends here also on the file sizes and on the quality of network connection to the server.
Warn me about missing WiFi/WLAN
If active, davi will warn you, if the WiFi/WLAN connection is missing. davi checks the WiFi/WLAN connection before it starts to connect to a WebDAV share. While being connected, davi monitors steadily the connection and warns you again if the WiFi/WLAN connection drops.
This option is intended for users, which use davi without a flat rate/unlimited plan for the mobile data connection. davi will help you avoiding extra operator charges, BUT be aware of our disclaimer, that we are not liable for any arising extra costs related to the usage of davi.
Hide hidden/AFP system files
Usually it is not of interest to show hidden files and hence this option is activated by default, but sometimes it is useful to manage or download hidden files. This applies only for UNIX-like hidden files with a dot file name prefix and AFP system files stored on WebDAV shares of network storage arrays.
Support for showing hidden files hosted on a Windows IIS Web server depends on the actual configuration of this Web server. If this is needed you have to make sure that this feature is properly activated as it is often per default disabled. Maybe you have to contact the technical administrator of the respective Windows Web server.


davi was developed for Nokia Belle and Nokia Belle FP1 (Feature Pack 1) devices.
These are the Nokia 603, Nokia 700, Nokia 701, and Nokia 808.
davi supports also the following phones after an update to Nokia Belle: Nokia N8, Nokia E7, Nokia C6-01, Nokia C7, Nokia X7, Nokia Oro, and Nokia 500.
Use the help on how to configure davi in general. Certainly, the various configuration examples for several network attached storage (NAS) systems and WebDAV online storage providers will be useful as well.
If your particular configuration is not listed in the configuration examples, please be so kind and share it with the other davi users via Email at davi@rebnil.com.
Reminder: You should always use encrypted HTTPS as transport protocol. Especially, if you use davi together with public WiFi, 3G, or GSM networks. Use HTTP only in secure network environments, e.g. access local WebDAV server on your secured local home WiFi.
At first, consider the configuration examples. They describe how to configure davi to get access to your NAS. Maybe, you would like to read again how to add/configure a WebDAV share in davi. Finally, use the following check list to troubleshoot your configuration of your NAS, your router, and davi.
Check again the configuration of your NAS.
Check the router's port-forwarding (NAT) configuration. Sometimes, a router don't accept automatic configuration via NAS management software.
Adapt the WebDAV share configuration in davi to eventual changes.
You still can't connect to your NAS WebDAV share with davi from the Internet? Ask your local network guru to help you or contact us (see below).
On some phones, davi can crash after pull-down of Nokia Belle notification bar/status bar. This problem is induced by Qt Quick Components 1.1 and affects also other Qt apps for Nokia Belle which use these components.
The solution for Nokia Belle 111.030.0609 (February Update, check with *#0000#) is:
Uninstall it: Menu > Settings > Application manager > Installed applications > Press-and-hold on "Qt Quick components for Symbian" and select Uninstall in the pop-up
Since Qt Quick components are already part of the Nokia Belle firmware, we didn't removed them actually after uninstall. We removed just this installed version. Subsequently, you can use davi as expected also in combination with the Nokia Belle notification bar/status bar.
Some Nokia Belle phones have to download additional or updated Qt components. Nokia's smart installer cancels the installation when a data connection isn't available. To circumvent an interrupted installation, you have to activate a working WiFi connection in advance to the installation. Otherwise you can go to the menu and select the smart installer icon, which then will proceed the installation if a working WiFi connection is available.
This problem has been observed with a Nokia N8-00 phone with Nokia Belle 111.030.0609.
Don't hesitate to contact us if you have your own question regarding the usage of davi:
Question via Email Question via Twitter 
 
 
If your particular configuration is not listed below, please be so kind and share it with the other davi users.
Share your configuration (via Email)Follow instructions from "Access your QNAP NAS remotely via WebDAV". Then, activate "Enable Secure Connection (SSL)" to make encrypted HTTPS connections available. Go to "Share Folders" menu to adjust the access rights for WebDAV for each individual share.
Create a DDNS account (e.g. dyndns.org). Configure your QNAP according to Dynamic DNS Service (DDNS) for an enabled remote access. Subsequently, configure your router for port-forwarding of remote TCP port 443 to your NAS server IP address with port 8081.
Follow instructions from "Accessing ReadyNAS remotely with WebDAV" to enable the WebDAV server in your ReadyNAS and select particular shares for WebDAV access.
Create a DDNS account (e.g. dyndns.org). Consider to install DNS-O-Matic plugin to update regularly your dynamic IP. Configure your router for port-forwarding of remote TCP port 443 to your NAS server IP address with port 443.
GoFlex WebDAV server should be enabled for HTTPS per default. (Kudos goes to "Setting Up Secure internet WebDAV access for GoFlex Home")
Create a Dynamic DNS service (DDNS) account (e.g. dyndns.org). Configure your router to work with the DDNS provider, so that the current public IP address of your home network is assigned to your DDNS hostname. Subsequently, configure your router for port-forwarding of remote TCP port 443 to your GoFlex NAS server IP address with port 443.
Follow instructions from "WebDAV & CalDAV" to enable the WebDAV server in your Synology. Activate "Enable WebDAV HTTPS connection" to make encrypted HTTPS connections available.
Create a DDNS account (e.g. dyndns.org). Configure your Synology according to How to access my Synology DiskStation via Internet for an enabled remote access. Subsequently, configure your router for port-forwarding of remote TCP port 443 to your NAS server IP address with port 5006.
Create an account at www.Box.com and add a new WebDAV account to davi as follows. Be aware that copy is currently not working.
Create an account at www.cloudme.com and add a new WebDAV account to davi as follows. Be aware that copy is currently not working.
Create an account at www.gmx.net and add a new WebDAV account to davi as follows.
Otixo.com provides unified WebDAV access to Dropbox, Box.com, Microsoft SkyDrive, Google Docs, Google Drive, SugarSync, Picasa, MobileMe, Amazon S3, MyDrive, CloudMe, Dump Truck, Digital Bucket, 4shared, Web.de, Files Anywhere, GoDaddy Online Storage, GMX.de, HiDrive, Strato, OnlineFileFolder.com
Create an account at Otixo.com and "Add New Cloud Service". Then, you can start using Otixo.com with davi.
Download and install ownCloud, create your ownCloud user account and add a new WebDAV account to davi as follows. It's assumed that your sever is accessible via HTTPS.
Create an account at Telekom Mediencenter (in German) and add a new WebDAV account to davi as follows. Be aware that copy and move works currently only with files and NOT with directories (will be fixed in later versions).
Create an account at www.WEB.DE and add a new WebDAV account to davi as follows.
Create an account at disk.yandex.ru and add a new WebDAV account to davi as follows.